System Configuration
EasyDCIM is a comprehensive data center management platform that brings together device provisioning, resource allocation, customer management, and automation into a single environment. Before putting the system into production, it’s essential to complete a one-time configuration that establishes your organization’s identity, sets up email communication, ensures access security, and prepares the provisioning engine. The steps below outline the most critical areas to configure for a stable and secure start.
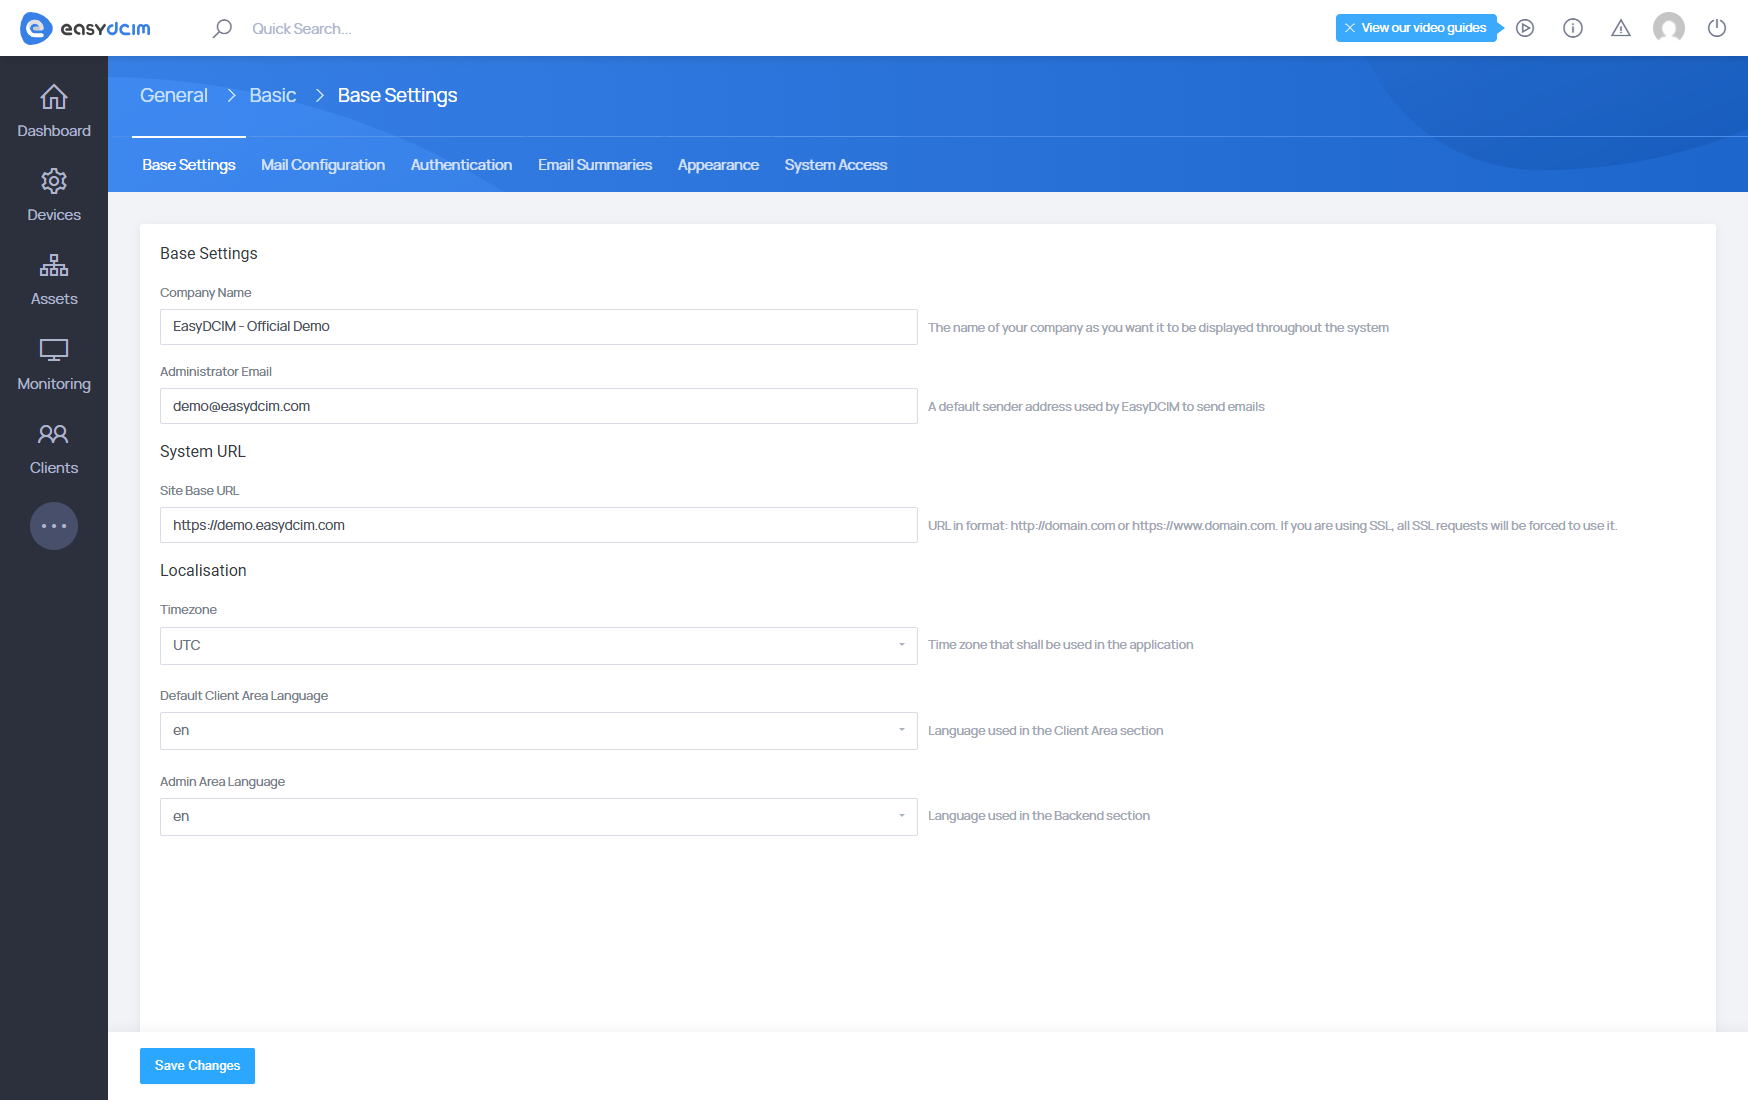
Step 1: Set Up Basic Information
Define your company identity, set localization options, and configure the base system URL. This step ensures your system reflects your company branding and functions within the correct regional context. It includes basic organizational information such as your company name, contact email, and system URL, as well as time zone and language preferences for both clients and administrators.
- Company Name – Enter the name of your organization.
- Administrator Email – Provide a valid admin email for notifications and system alerts.
- Site Base URL – Use your full domain (e.g.,
https://yourdomain.com). Make sure to use HTTPS if SSL is enabled. - Timezone – Select your time zone (e.g.,
Europe/Warsaw) to ensure correct logging and time tracking. - Languages
- Set the Client Area Language (used by customers).
- Set the Admin Area Language (used by administrators).
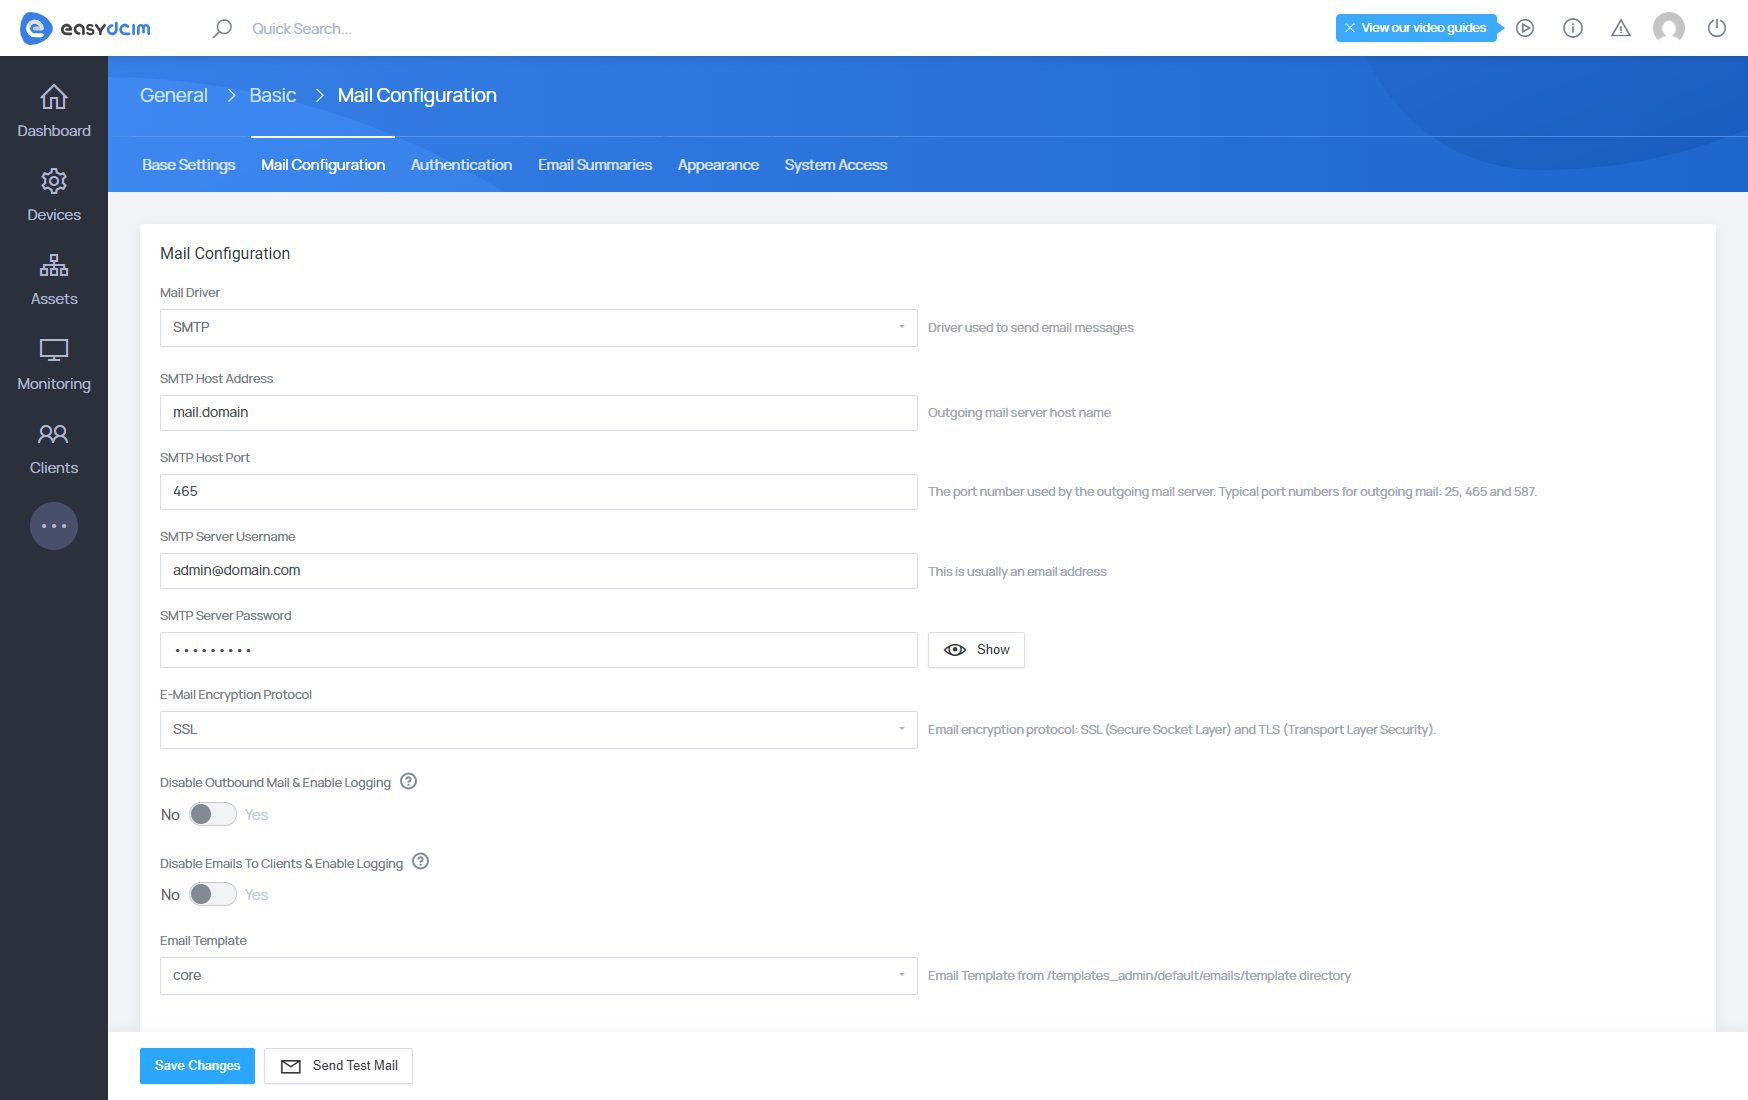
Step 2: Configure Mail Settings
Enable the system to send transactional and notification emails through a secure SMTP server. Email notifications are crucial for system operations such as new order alerts, system warnings, and user registration. By configuring SMTP correctly, you ensure that all messages are securely delivered and reach the right recipients.
- Mail Driver – Choose
SMTPas the mail driver. - SMTP Server Details:
- Host Address (e.g.,
mail.yourdomain.com) - Port (commonly
587for TLS or465for SSL) - Username & Password – Enter valid credentials for the mail server.
- Host Address (e.g.,
- Encryption – Select
TLS(preferred) orSSL. - Outbound Mail Options
- Optionally disable sending emails system-wide or to clients only, while retaining logs for debugging.
Customize Email Appearance
After setting up your mail configuration, you can customize the appearance of system email messages to match your brand. Go to: Basic System Settings → Appearance → Email Appearance.
Here you can:
- Adjust the CSS styles used in email templates.
- Edit the footer content to include company details, disclaimers, or contact info.
- Use dynamic variables to personalize messages.
The base content of each system email is generated dynamically by the application based on the action performed (such as order confirmation, account creation, or system alert). You can modify only the email footer, the logo, and the CSS styling — the main body text is populated automatically by the system. This ensures your transactional emails are both functional and visually consistent with your corporate identity.
Available Mail Template Variables
You can use the following variables inside your email templates. Variables can only be used in the Email Footer field.
| Variable | Example Value |
|---|---|
{{ logo_url }} |
https://your-easydcim.com/uploads/settings/logo.png |
{{ app_name }} |
Dedicated Servers Provider |
{{ app_url }} |
https://your-easydcim.com |
{{ current_year }} |
2025 |
{{ date }} |
2025-08-14 |
{{ datetime }} |
2025-08-14 12:42:27 |
{{ formatted_date }} |
August 14, 2025 |
{{ formatted_time }} |
12:42 |
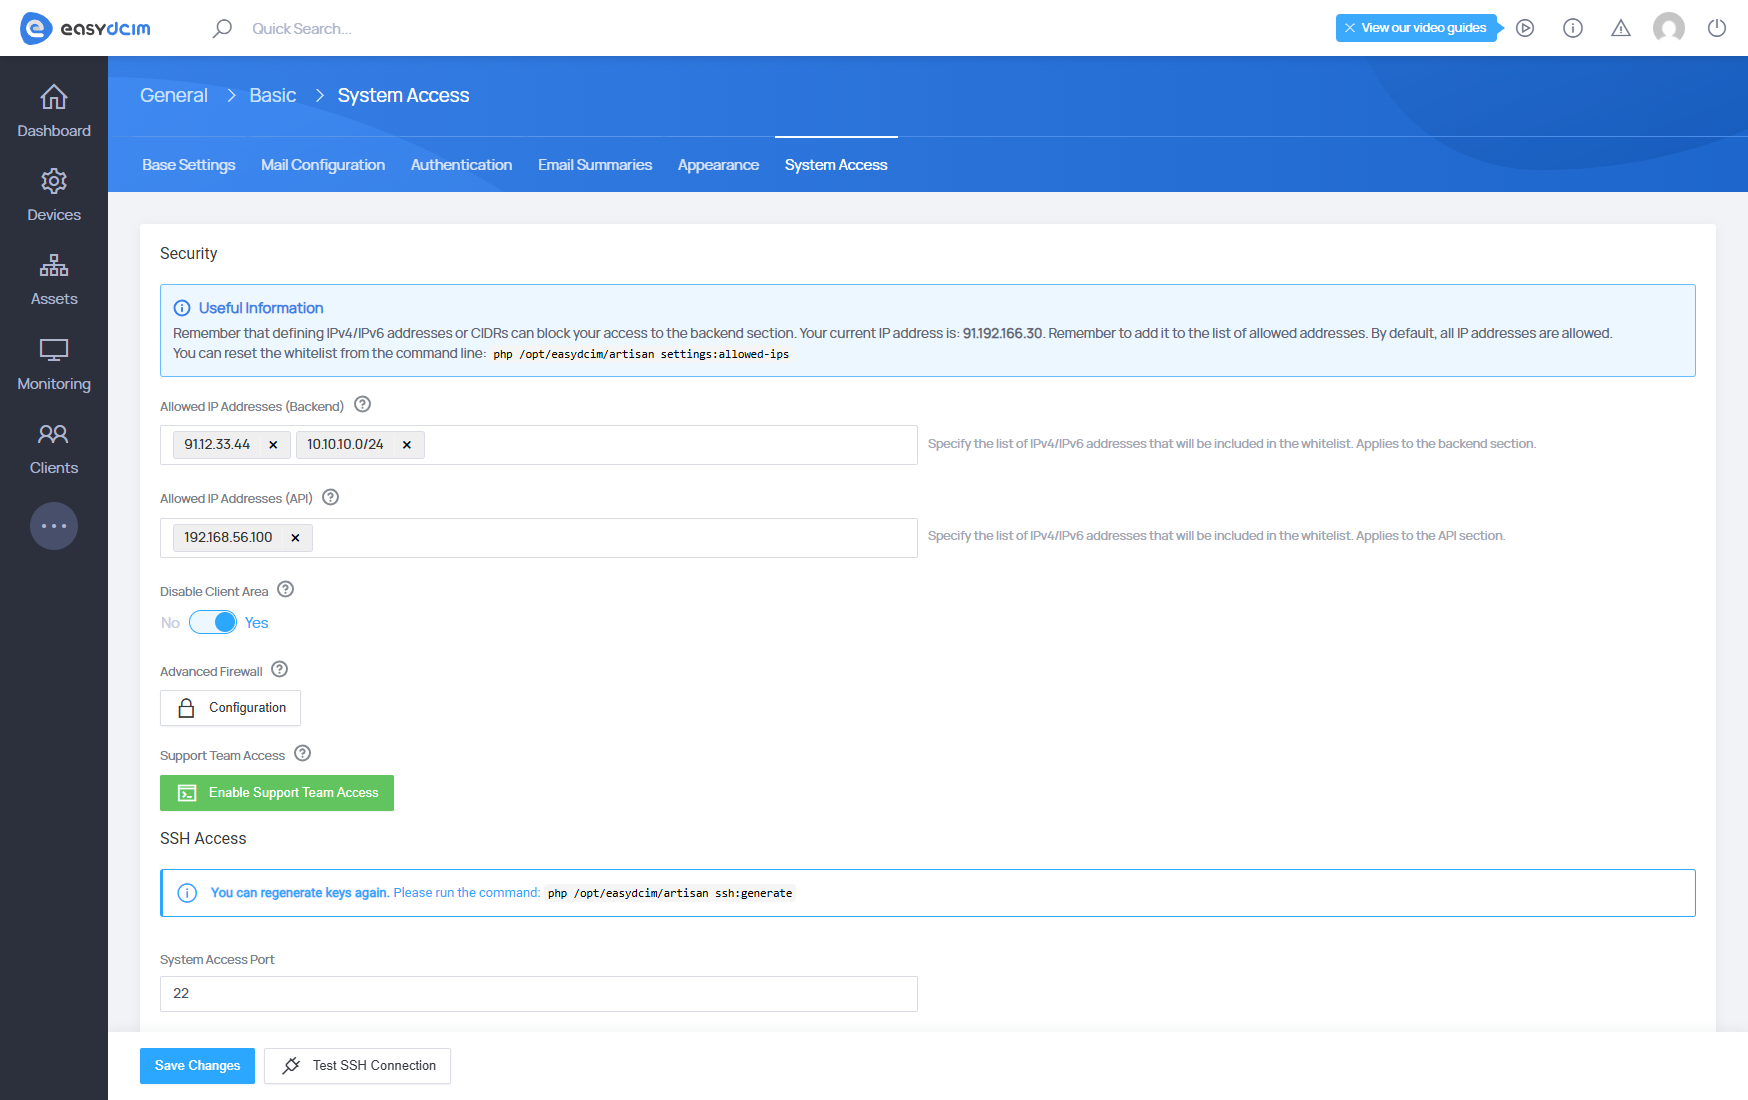
Step 3: Secure System Access
Restrict access, configure firewalls, and protect remote entry points to keep your system safe. Security is critical in any infrastructure management system. In this step, you’ll define trusted IP addresses for backend/API access, configure firewalls like ModSecurity, and ensure that only authorized personnel can reach core components via SSH or through support access.
- Restrict Access by IP
- Add allowed IP addresses for backend and API (e.g.,
192.168.1.1or192.168.1.0/24)
- Add allowed IP addresses for backend and API (e.g.,
- Enable ModSecurity
- Activate this firewall to block web threats like XSS and SQL injection.
- Add trusted IPs to bypass filtering, if needed.
- Manage SSH Access
- Use a custom SSH port (default is
22) for added security.
- Use a custom SSH port (default is
- Allow Support Team Access
- Enable this feature to allow EasyDCIM support staff to assist when necessary.
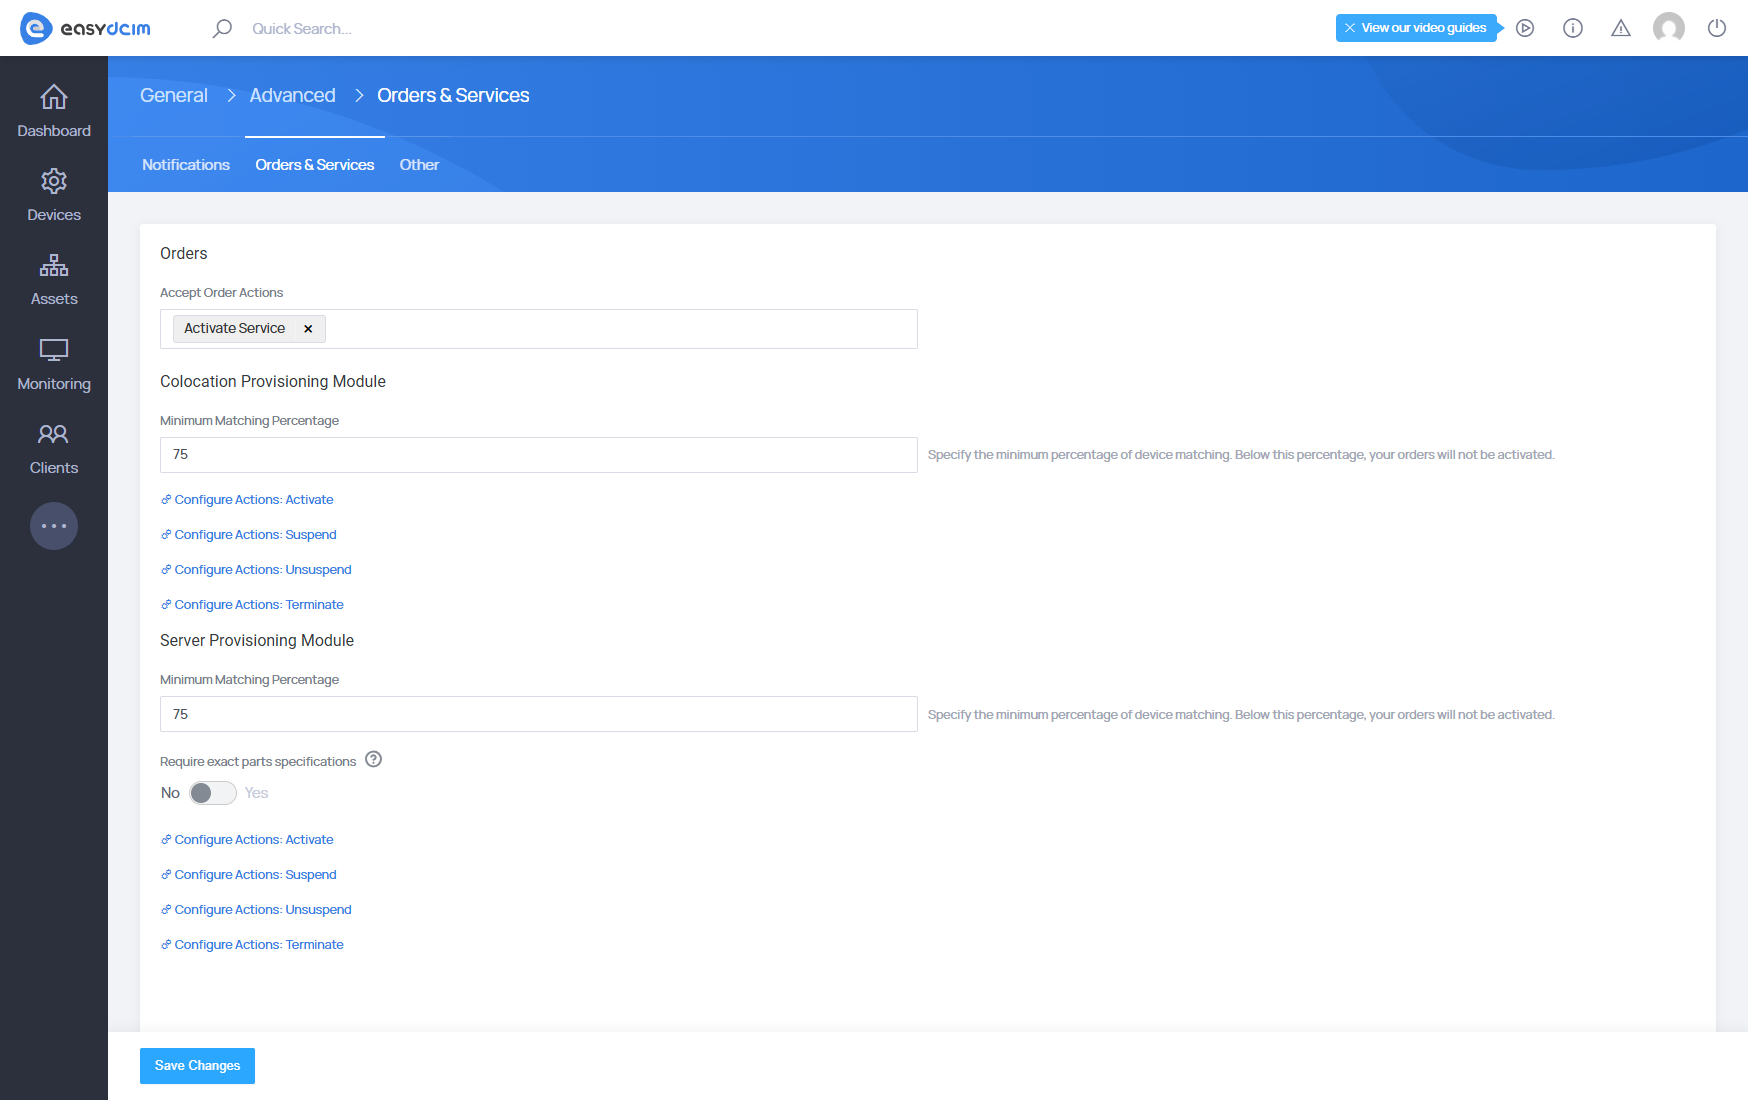
Step 4: Set Up Orders and Service Provisioning
Automate provisioning for services and servers, and control order behavior. This step configures how EasyDCIM handles service orders, including provisioning accuracy, hardware matching requirements, and action workflows. It allows your team to standardize service delivery while minimizing manual intervention.
Server Provisioning Module
- Minimum Matching Percentage – Require a high level of hardware match (e.g., 100%) for provisioning server orders.
- Configure Actions – Define actions for managing the server lifecycle, including activation, suspension, unsuspension, and termination. A detailed explanation of how each provisioning action works, along with a reference table of all available actions, can be found in Provisioning Actions Overview section.
- Require Exact Parts Specifications – When enabled, provisioning will only occur if the hardware matches the order exactly.
Colocation Provisioning Module
- Minimum Matching Percentage – Set the minimum percentage of resource matching required to activate a colocation order.
- Configure Actions – Set actions such as Activate, Suspend, Unsuspend, and Terminate for colocation services.
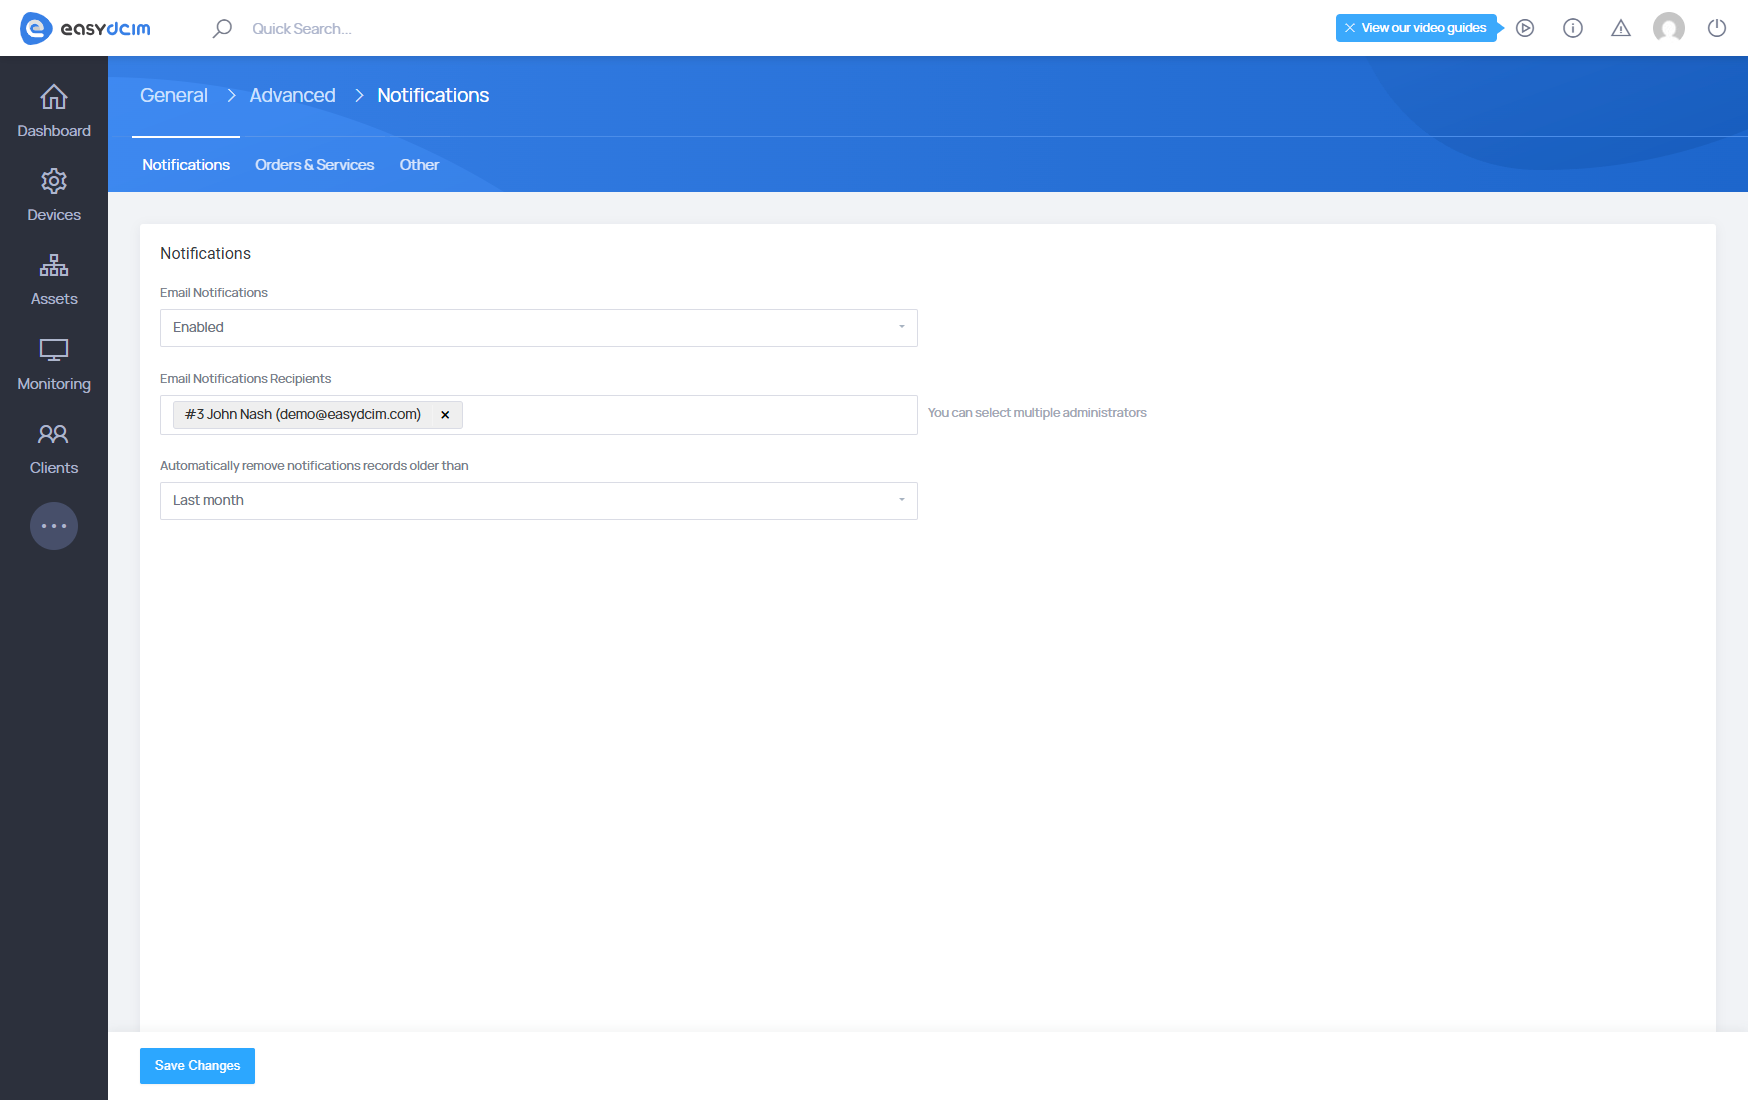
Step 5: Configure Notifications
Control how the system communicates alerts and manage notification cleanup. Notifications allow administrators to stay informed about activity within the system.
- Email Notifications – Toggle system-wide email notifications on or off.
- Email Notifications Recipients – Define specific administrators who should receive system alerts.
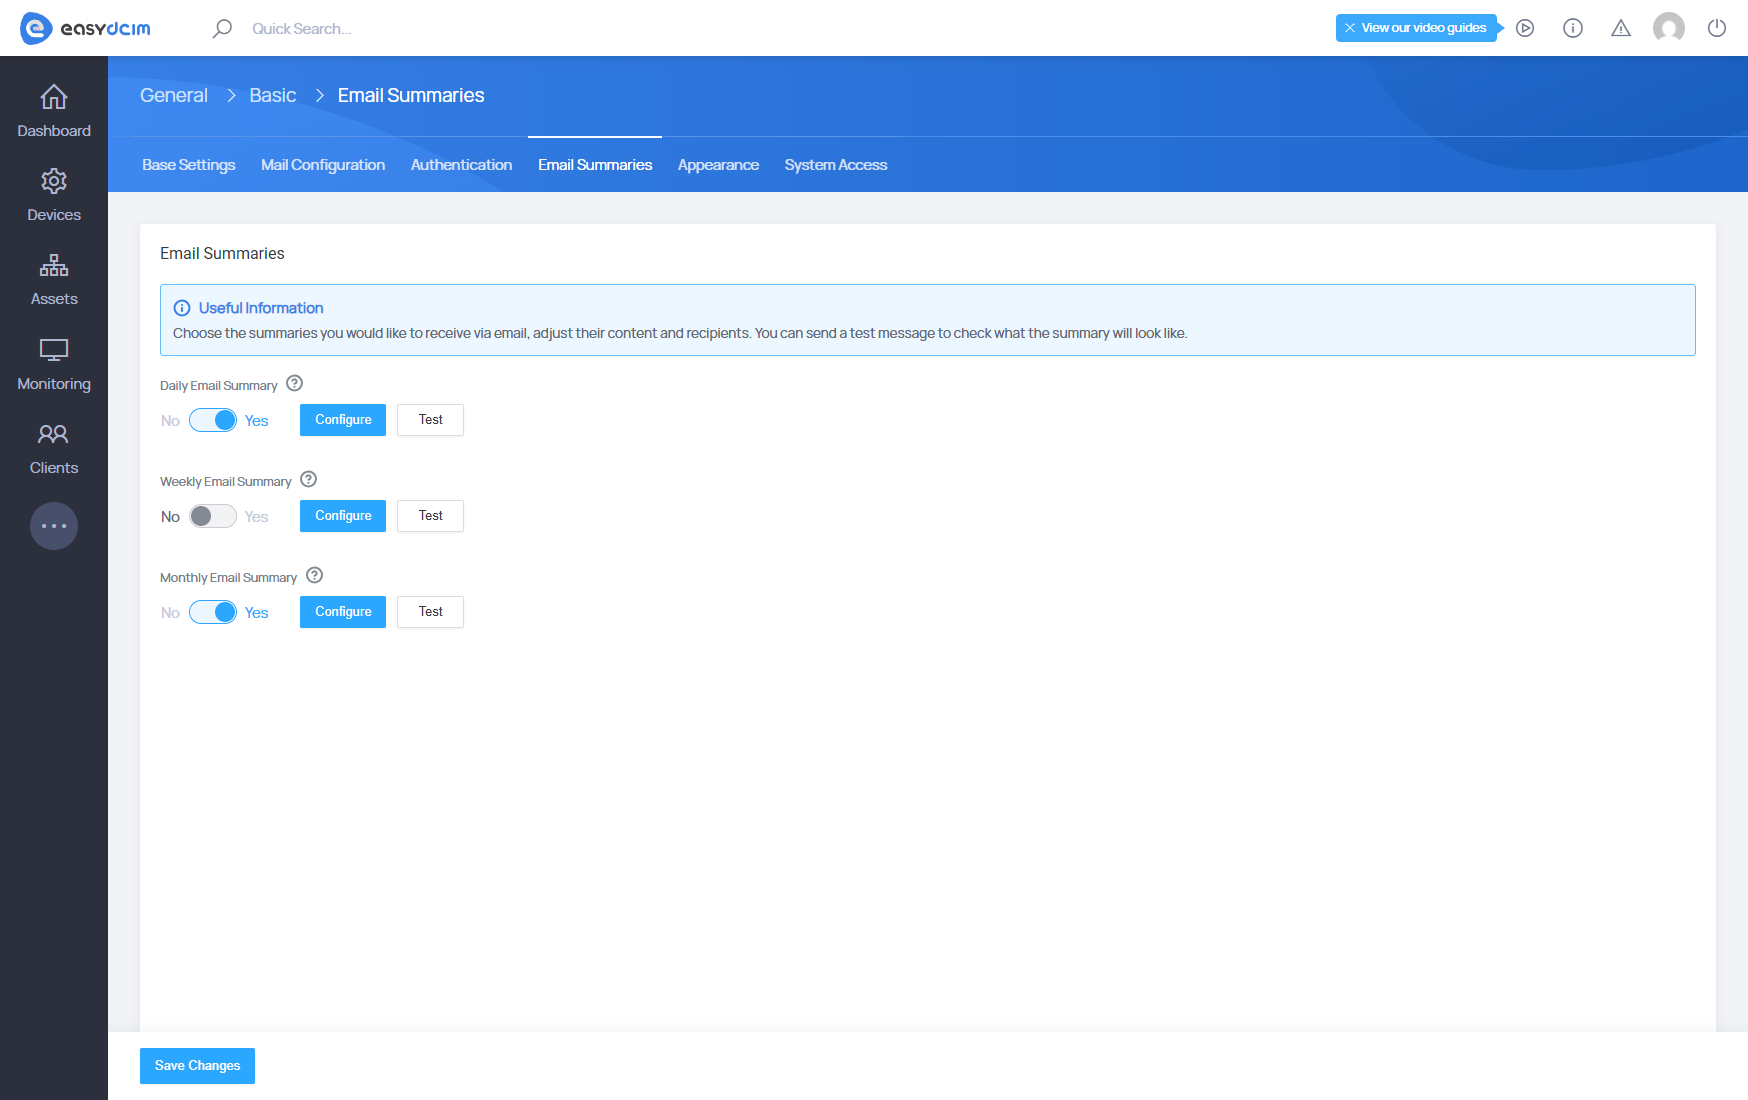
Step 6: Optional Enhancements
Personalize the interface and automate system reporting for a better management experience. Once core functionality is configured, you can enhance the experience for both users and admins by customizing appearance elements and setting up automated summary reports to track key metrics and events.
- Email Summaries
- Enable and configure daily, weekly, and monthly system summary emails.
- Use the “Test” option to preview the messages before sending.
- Customize Appearance
- Upload your company logo and favicon.
- Apply custom CSS to tailor the look and feel of the Admin and Client Areas.
Final Notes
By following these steps, your EasyDCIM system will be correctly initialized, secured, and ready for daily use. Always verify each configuration and test your setup before going live.
For a complete list and detailed explanation of all system configuration fields, visit the System Configuration Fields: Quick Reference.