


Client Area Configuration
The Client Area is the front-end interface dedicated to your end users. It allows clients to manage their services, access IPMI consoles and perform other account-related actions.
By default, the Client Area is installed locally, as an integrated part of the EasyDCIM platform. However, it can also be installed on a separate remote server — for example, in distributed or high-availability environments.
The Client Area runs inside a dedicated Docker container, providing an isolated and consistent runtime environment. It uses Nginx as the web server and is built from a lightweight Debian 13 image. This containerized setup ensures easy deployment, simplified updates, and compatibility across different environments.
Requirements
Before installing the Client Area, make sure that the target environment meets the following system and network requirements.
System Requirements:
- A server running Debian 12 (Bookworm)
- Root or sudo access to perform the installation
- At least 4 GB RAM and 4 vCPU (recommended minimum)
Network Requirements:
-
The Client Area server must be able to communicate with your EasyDCIM instance via:
80/TCPor443/TCP– for API communication6081–6200/TCP– for noVNC console (Websockify sessions)
Ensure that outbound connections to these ports are allowed in your firewall configuration.
Access and Configuration
The Client Area is fully powered by the EasyDCIM APIv3, which enables real-time and secure communication between the client interface and your EasyDCIM backend. All data displayed in the Client Area — including devices, services, and user actions — is fetched directly through authenticated API calls.
Local Installation (Same Server as EasyDCIM)
When the Client Area is installed locally, on the same server as EasyDCIM:
- It operates using ports 8444 (HTTP) and 8443 (HTTPS).
- Access is automatically redirected to:
https://YOUR-EASYDCIM-URL/client - Both the Client Area and EasyDCIM share the same domain, environment, and SSL configuration.
This mode requires no additional routing or domain configuration and is suitable for standard single-server deployments.
External Installation (Separate Server)
When the Client Area is installed on a different server than EasyDCIM:
- It uses standard web ports 80 (HTTP) and 443 (HTTPS).
- It runs as an independent web application under its own domain or subdomain.
- The
/clientsuffix is not used — the Client Area is available directly at its root address.
Example external deployment domains:
https://clients.yourcompany.comhttps://portal.example-hosting.nethttps://my.easyconsole.io
In this setup, only the Client Area is exposed publicly, while the EasyDCIM backend may remain accessible solely through a private network, VPN, or internal routing. The Client Area communicates with EasyDCIM through secure APIv3 calls, without requiring the backend to be publicly reachable.
Backend Configuration Fields
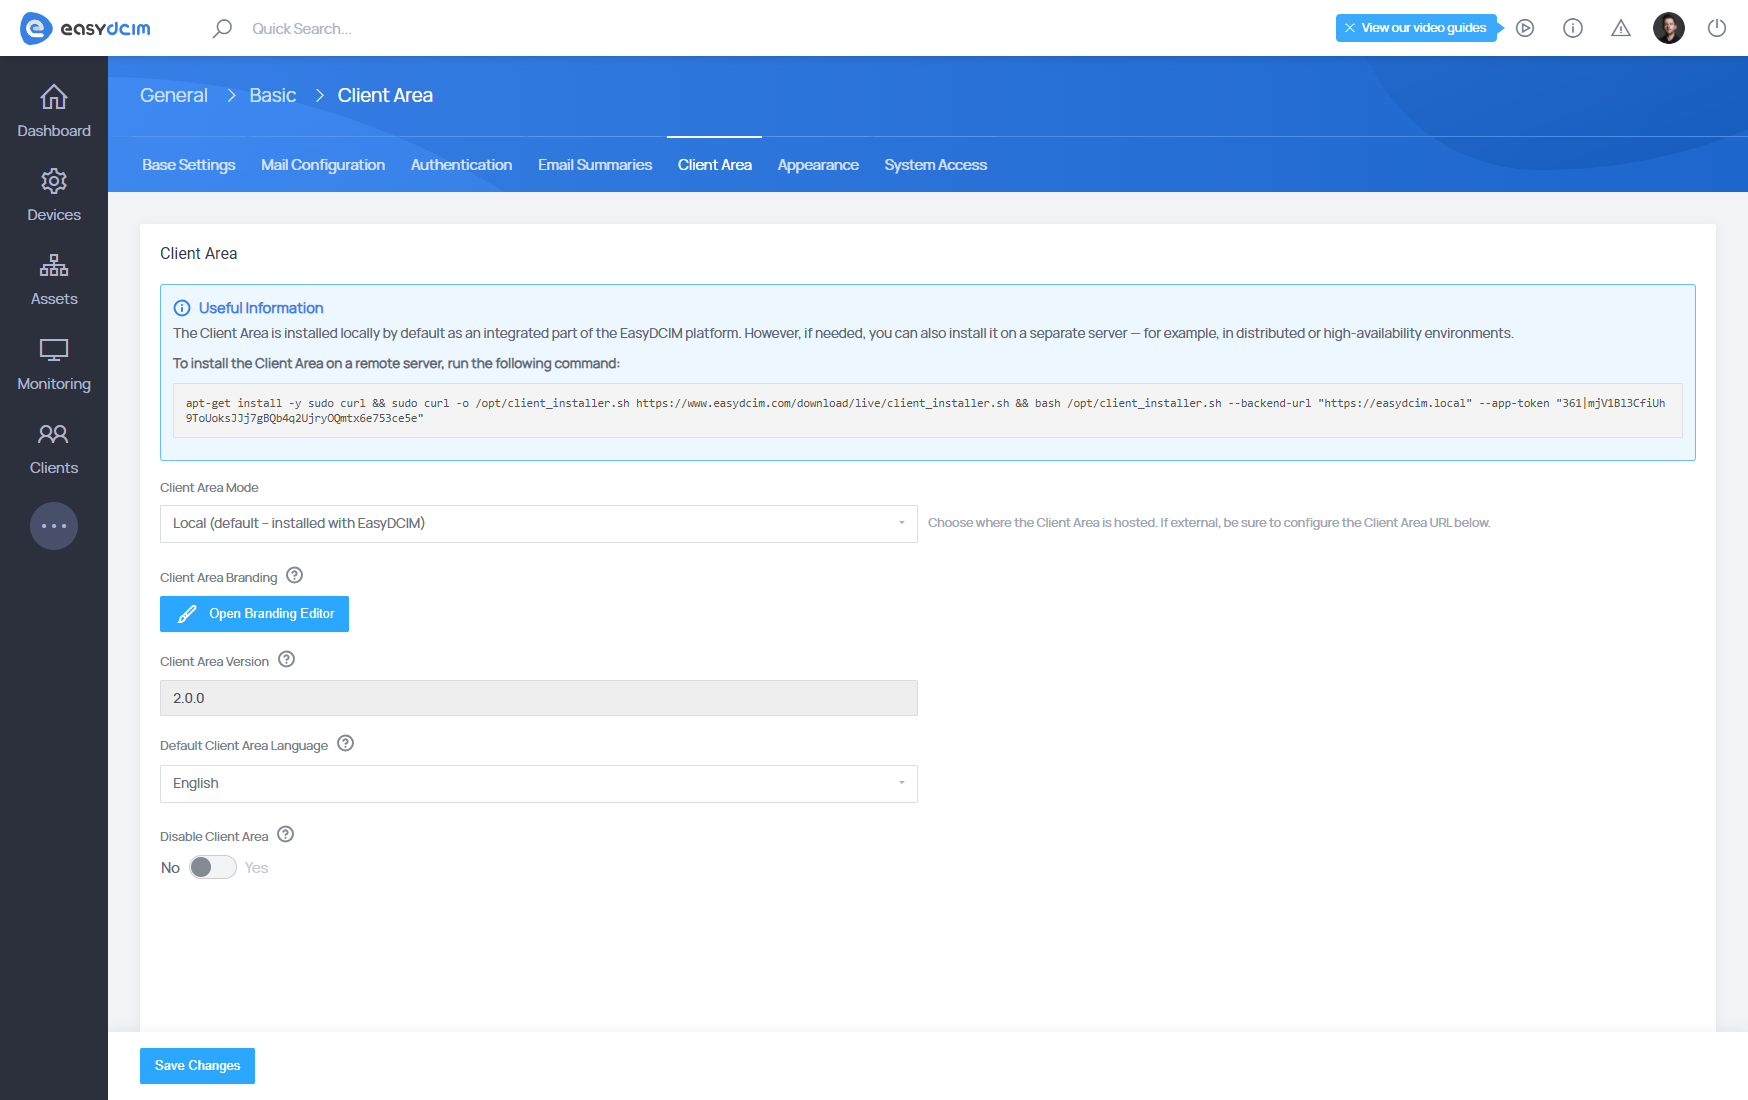
Within the Settings → Basic → Client Area section, you can configure all backend parameters related to the Client Area connection and behavior:
-
Client Area Mode – Defines where the Client Area is hosted:
- Local – Installed and integrated directly within the EasyDCIM instance (default).
- External – Hosted on a separate remote server.
-
Client Area Branding – Opens the Branding Editor, where you can adjust the logo, colors, and theme elements visible to clients.
- Client Area Version – Displays the currently installed version of the Client Area package.
- Default Client Area Language – Specifies the language displayed by default to all users upon first login.
- Disable Client Area – Allows you to temporarily deactivate client access. When enabled, the client interface becomes unavailable to end users.
Installation
To install or manage the Client Area, navigate to: Settings → Basic → Client Area. On this screen, you will find the installation and update commands tailored for your environment.
Below is a sample installation command:
apt-get install -y sudo curl && sudo curl -o /opt/client_installer.sh https://www.easydcim.com/download/live/client_installer.sh &&
bash /opt/client_installer.sh --backend-url "<YOUR_BACKEND_URL>" --app-token "<YOUR_APP_TOKEN>"
This command will download the latest Client Area installer script, automatically set up the environment and connect it to your EasyDCIM backend instance, and configure a secure Nginx-based environment with SSL support.
Important:
Replace the placeholders <YOUR_BACKEND_URL> and <YOUR_APP_TOKEN> with the actual values displayed in your EasyDCIM panel under Settings → Basic → Client Area.
Example:
--backend-url "https://demo.easydcim.com"
--app-token "34|aVsfnLAjLHaMrFP6xlq8OJPacRVsU3gz3HIvCtSb701d64d1"
Updating the Client Area
To update an existing Client Area installation, run the following command:
apt-get install -y sudo curl &&
sudo curl -o /opt/client_updater.sh https://www.easydcim.com/download/live/client_updater.sh &&
bash /opt/client_updater.sh
The updater will download the latest Client Area build, automatically perform system checks, and update all required components while preserving your configuration and SSL certificates.
SSL Configuration
The Client Area includes full SSL support, ensuring that all connections are secure and encrypted. You can choose from several SSL configuration methods depending on your needs and environment setup.
These options are available only when the Client Area is installed on a separate server and domain. If you use the local Client Area integrated on the same server as EasyDCIM, the system automatically uses the same SSL certificate that secures your EasyDCIM installation.
Free SSL (Let’s Encrypt)
If your Client Area is accessible from the internet and has a registered domain name, you can secure it using a free SSL certificate from Let’s Encrypt.
To issue a Let’s Encrypt certificate:
- Connect to the server where the Client Area is installed.
- Run the following command, replacing
<your-domain>with your actual domain name:
bash /opt/easydcim_client/scripts/letsencrypt/install.sh <your-domain>
To renew the certificate, simply run:
bash /opt/easydcim_client/scripts/letsencrypt/renew.sh
The renewal process is quick, automatic, and does not require any reconfiguration. You can also automate it by adding the command to cron so it runs twice a day, for example:
0 3,15 * * * bash /opt/easydcim_client/scripts/letsencrypt/renew.sh >/dev/null 2>&1
This example runs the renewal every day at 3:00 AM and 3:00 PM, keeping your SSL certificate always up to date.
This method is recommended for public production environments where the Client Area is accessible under a valid domain.
After successfully configuring the SSL certificate for your domain, go to Settings → Basic → Client Area and enter your domain in the Client Area URL field in the following format: https://YOUR_DOMAIN
This ensures that the Client Area is loaded securely using HTTPS and that all integrations and redirects work correctly.
Paid or Custom SSL Certificates
If you use your own SSL certificates (for example, from a commercial provider), you can easily install them as well.
- Prepare the full paths to your certificate (
fullchain.pem) and private key (privkey.pem) files. - Run the following command, replacing the paths with your own:
bash /opt/easydcim_client/scripts/ssl/install.sh /etc/ssl/mydomain/fullchain.pem /etc/ssl/mydomain/privkey.pem
This option is recommended for users who already have a paid or organization-validated SSL certificate and prefer to use it instead of Let’s Encrypt.
After successfully configuring the SSL certificate for your domain, go to Settings → Basic → Client Area and enter your domain in the Client Area URL field in the following format: https://YOUR_DOMAIN
This ensures that the Client Area is loaded securely using HTTPS and that all integrations and redirects work correctly.
noVNC Console Sessions
The Client Area provides built-in support for noVNC console sessions, enabling users to remotely access their devices directly through a web browser. All console traffic is securely proxied through Nginx using a WebSocket connection to the EasyDCIM backend.
When a session is initiated, the Client Area automatically establishes a tunnel to EasyDCIM via the /websockify/<port> endpoint, ensuring full compatibility with EasyDCIM’s native VNC service. This proxy layer delivers a stable and encrypted communication channel without exposing internal VNC ports to the public.
Because all communication is routed through the Client Area, users can access their dedicated servers in real time while maintaining end-to-end security under the same SSL certificate used by the Client Area interface.
External Client Area Deployment
If you run the Client Area on a separate external server, you can further enhance security by restricting public access to the EasyDCIM backend entirely. In this scenario:
- Only the Client Area communicates directly with the EasyDCIM server (e.g., over a private network or VPN).
- End users connect exclusively to the Client Area, meaning the EasyDCIM backend does not need to expose any console-related ports to the public Internet.
This architecture helps maintain a clean security boundary, isolating your EasyDCIM environment from external access while still providing full console functionality to clients.
Ports Used by Client Area
The Client Area uses the following ports to establish proxied noVNC console sessions with EasyDCIM:
- 6081–6200/TCP – noVNC (Websockify) console sessions proxied through the Client Area to the EasyDCIM backend.

